Blog List

Tuesday, 12 April 2016

REBATE PLANE

The rebate plane (also known as the rabbet plane) is a hand plane, designed for cutting rabbets in wood. It's a simple tool, used in many Western countries, with hundreds of years of history. It was in use in England at least as early as the 11th century.
A wood rabbet plane.
The rebate plane is one of a group of planes including the shoulder plane, bullnose plane and carriage makers plane in which the blade protrudes by a very small amount - usually less than half a millimetre - from the sides of the plane body on both sides. The blade is very slightly wider than the body of the plane. The reason for the slight protrusion of the blade is so that the plane body does not bind on the side of the cut, which would result in the side wall of the rebate not being perpendicular to the bottom.
Rebate planes are intended for long grain cutting and are generally set up to remove large amounts of material quickly. The mouth is set quite coarsely to allow large chips to be removed.
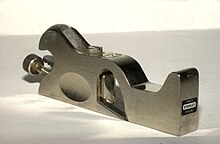
A Stanley #92 Cabinet Maker's Rabbet Plane.
There are a few variations of this plane, including the duplex rebate plane, which has two locations for the blade; one in the middle of the body for normal cutting; and one at the front to allow cutting into corners. In the latter mode, the duplex rebate plane is similar to a bullnose plane.
The rebate plane commonly has a depth stop and a fence which allows the width and depth of the rebate to be gauged. They also are commonly equipped with a spur which is designed to score the wood as the rebate is cut, giving a cleaner corner. This is particularly valuable when working across the grain.
A rabbet or rebate
References

  1. ^ "No. 78 Rabbet and Fillister Plane".

- Wikipedia 


CARD SCRAPER

card scraper is a woodworking shaping and finishing tool. It is used to manually remove small amounts of material and excels in tricky grain areas where hand planes would cause tear out. Card scrapers are most suitable for working with hardwoods, and can be used instead of sandpaper. Scraping produces a cleaner surface than sanding; it does not clog the pores of the wood with dust, and does not leave a fuzz of torn fibers, as even the finest abrasives will do.


Card scraper in use.

Types of cards scrapers
Card scrapers are available in a range of shapes and sizes, the most common being a rectangular shape approximately 3"x 6". Another common configuration is the gooseneck scraper, which has a shape resembling a french curve and is useful for scraping curved surfaces. For scraping convex shapes such as violin fingerboards, small flexible rectangular scrapers are useful.
Scrapers are normally made from high carbon steel. There are many manufacturers who provide scrapers in a wide variety of styles. Many woodworkers prefer to make their own card scrapers by cutting them from old hand saw blades.
Various scrapers, with burnisher.
Card scrapers are sometimes used in working with ceramics, where they may substitute for the more traditional wooden rib. The scraper is also useful for trimming damp or dry clay. Such a scraper, the nearest one to the camera, is shown in the image at right.
Turning the burr
The cutting component of a card scraper is the burred edge of the scraper. The burr is a sharp hook of metal which is turned on the edge of the scraper by burnishing with a steel rod. A file or sharpening stone is used to joint the edge of the scraper before burnishing. Cabinet makers typically joint the edge square, or at a right angle to the face of the scraper, which allows a fine burr to be turned on both sides. Luthiers often use a beveled edge, which allows a more aggressive burr, but on one side only.
Burnisher for card scrapers.
There are a number of variations in the process of turning the burr, the choice of which is down to personal preference. However the basic concept is that the burnishing rod is held against the edge of the scraper at a slight angle and drawn along the edge a number of times until the burr is created. One variation involves holding the rod flat against the side of the scraper for the first few passes to create a burr pointing away from the edge and this is then rolled back down by drawing the rod along perpendicular to the scraper.
Process of sharpening:
1. Rough edge
2. Squared edge
3. (Optional) first pass
4. Turning the burr.
With the burr properly turned, a scraper will produce miniature shavings resembling those from a plane. If only dust is produced, either the scraper is not sharp, or not being used correctly.
Use
In use, the card scraper is grasped by the fingers, one hand on either side, and tilted in the direction of travel. The degree of tilt controls the effective angle of the cutting edge, which is the burr. Practice is required to find the correct angle. In addition to the tilt, the user will usually flex the scraper slightly by holding it at the edges with the fingers and pressing in the centre with the thumbs. The slight flex causes the corners of the scraper to lift slightly thus preventing them from marring the workpiece.
The scraper may be drawn towards the user or pushed away, although some woodworkers claim that pulling the scraper towards one can cause it to dip, resulting in an uneven surface.
The main drawback of a card scraper is that the usage is a difficult skill to master. It takes a bit of practice to turn the burr correctly and then the scraper must be presented to the work in the correct fashion. Also, due to the friction created in use, the card scraper can become hot enough to burn fingers.
Some woodworkers use the term "cabinet scraper" instead of "card scraper" for this tool. A separate tool, also called a cabinet scraper, differs in having a beveled edge like a plane.
A variation of the card scraper is the scraper plane which consists of a hand plane body in which a card scraper is mounted. There are also various styles of holder which can be used for this purpose. These simplify the use of the card scraper and alleviate the problems associated with heat.
Leveling cello arching with card scraper.
Burnishing jigs and other accessories are available to assist in turning the burr, which makes the card scraper more accessible to the novice.
External Links

  • Sharpening and Burnishing a Scraper - Step by step instructions for quickly getting a hand scraper ready for use, from the Mottola Lutherie (guitarmaking) Information Website.

- Wikipedia 

JAPANESE CARPENTRY

Japanese carpentry is distinguished by its advanced joinery and its finely-planed wood surfaces.


Yogoya type traditional roof framing, called western style.
Schools of carpentry
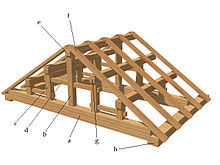

Wagoya type traditional roof framing, a post-and-lintel type of framing.
Though there is a core practice shared by all Japanese carpenters, defined by a vocabulary of tools and joints and a methodology of working, a carpenter will typically identify with one of four distinct carpentry professions. Miyadaiku 宮大工 practice the construction of Japanese shrines and temples, and are renowned for their use of elaborate wooden joints and the fact that the buildings they construct are frequently found among the world's longest surviving wooden structures. Teahouse and residential carpenters, known as sukiya-daiku 数奇屋大工, are famed for their delicate aesthetic constructions using rustic materials. Furniture makers are known as sashimono-shi 指し物師, and interior finishing carpenters, who build shōji 障子 and ranma 欄間, are termed tateguya 建具屋.
Though it is rare to find a sashimono-shi or tateguya practising outside of their field, it is not uncommon for a carpentry workshop to work simultaneously as both miyadaiku and sukiyadaiku.
Tools
The tools commonly used by Japanese carpenters are divided into a few basic families, within which there are found a multitude of variations and specializations geared toward particular tasks:
Japanese saw (nokogiri 鋸), which cuts on the pull stroke, rather than the European style push stroke. This allows the blades to be quite thin in comparison to the Western saw. There are two main kinds of cutting teeth on Japanese saws: rip (yoko noko-giri)and crosscut (tate-noko-giri). The rip and crosscut are combined in one blade, known as a ryoba (lit. "dual edge":; 両刃). The rip and crosscut patterns are also made in single-edged saws, kataha nokogiri 片刃, both with stiffening back pieces and without. The stiff-backed saws, known as douzuki (lit. "with guide"; 導付き) are typically used in cutting fine joinery. There are many other types of Japanese saws as well: osae-biki 押さえ引き鋸 (lit. "press-cut saw"), used for flush-cutting pegs to a surface without marring the surface. The saw teeth have no set to one or both sides to accomplish this feat. There is the azebiki (lit. ridge saw; 畔挽き), which has cutting both rip and crosscut teeth, and is short and rounded in profile. It is used for sawing in confined areas and starting cuts in the middle of surfaces. There are many other types and sub-types of saw. Most saws sold in the West are mass-produced items with induction-hardened teeth and relatively cheap replaceable blades. The handmade forged saws are very laborious to make and involve more manufacturing steps in the forging to complete than planes or chisels.
Japanese plane (kanna 鉋), is most commonly a wooden block, or dai (台) containing a laminated blade, sub-blade, and securing pin. This is similar in respects to the archaic type of European wooden plane, in which the blade is fixed in place by tapping down upon a wooden wedge. In the Japanese plane, the blade is fixed in position primarily by the confines of the plane's throat opening. Unlike a western plane, the support bed for the blade is not a flat surface in a Japanese plane - rather it is convex. The blade itself is tapered both in thickness and in width so as to wedge tightly into the dai when tapped down into place. Japanese planes are operated by pulling rather than pushing, and much work is done in the seated position or alongside a planing beam.
Considered part of the kanna family, the yarigana is an archaic type of Japanese plane resembling a spear. The yarigana is a single piece of steel with one end being used as a handle and the other forged into a leaf shaped blade. The carpenter holds the yarigana with two hands, perpendicular to his arms, and pulls towards his body producing a concave gouge in the timber. The yarigana was in universal use prior to the introduction of the block-mounted wood plane to Japan, and is today typically reserved for use on large circular columns or in cases where a more rustic appearance is desired in the final element.
Japanese chisel (nomi 鑿). These come in a larger variety of types and gradations than the Western chisel. There are bench chisels, paring chisels, striking chisels, heavy timber chisels and slicks, and myriad others for specialized applications. Like the planes, the blades are of laminated hard steel/soft steel construction. Bevel angle varies from 20˚ to 35˚ typically, with mortising and heavy chisels featuring steep angles, and paring chisels having shallower angles. It is common in Japan to work with softwoods, so many chisels are made with that in mind, and require the bevels be steepened if employed for harder woods.
Japanese gimlet (kiri 錐). The kiri is used for boring circular holes in a timber, often as the first stage in the hollowing out of a mortise. Though seemingly simple to use, the kiri is commonly considered one of the most difficult tools to master.
Inkpot (sumitsubo 墨壺), The sumitsubo is used for marking long straight lines onto various surfaces. A thread (tsuboito) is tied to a rounded piece of wood with a needle fixed at the end (karuko). The other end of the thread is passed through the small opening at the end of the sumitsubo (itoguchi), through the depression containing ink (ike) and wound around a spool (itomaki-guruma). The ink is stored in the ike soaked in silk wadding. Silk threads are used as tsuboito. To draw a line, the sumitsubo is held in the left hand and the karuko's needle is fixed onto the surface determining the position of one end of the thread. The sumitsubo is gradually moved away from the karuko until the required length of the thread is unreeled at which point the rotation of the spool is stopped using the thumb. With the index finger the thread is pressed down at the required end point of the line. Using the right hand, the thread is pulled upwards into tension and then suddenly released, consequently hitting the surface and leaving a straight line of ink onto any surface, regardless of any surface irregularities. 
Japanese axe and adze (ono 斧 and chōna 釿).
Japanese hammer (tsuchi 槌).
Tools for measuring and marking include the bamboo pen (sumisashi 墨さし), carpenter's square (sashigane 差し金), and the traditional marking gauge (kebiki 罫引), among others.
Blades
Though a carpenter will typically fashion handles and woodblocks and set and sharpen his blades himself, the blades themselves are forged by steel smiths and provided unmounted to the carpenter. Japanese steel has long enjoyed a high level of refinement, without which the fine surfaces and detail for which Japanese woodwork is renowned would not be possible. The blades used in the Japanese chisel and the Japanese plane shares similar constructive principles to the Japanese sword. A thin piece of extremely hard blade metal called ha-gane 鋼 (lit. "edge metal") is forge-welded to a softer piece of metal called ji-gane (lit. "base metal" 地金). The function of the softer base metal is to absorb shock, and to protect the more brittle ha-gane from breaking. This technology allows for the use of steels in the hagane which are harder than in use in Western chisels, typically Rockwell 62 and up, and also allows for the honing of a much finer edge than is typically known in carpentry outside Japan. When sharpening a blade, a Japanese carpenter will typically use three or more whetstones of varying coarseness, progressing from the roughest stone to the finest.
The blades of both planes and chisels are distinguished by the hollow, ura in their flat side. This hollow portion has a number of functions. The primary function is that it ensures a high degree of flatness when sharpening, in that when the flat side is polished it cannot rock or develop a curve because it is only contacting the stone on either side of its width. This then improves the precision with which cuts can be made by the chisel, and in the case of planes ensures smooth contact with the wedge and therefore even support across the full width of its blade. The hollow also greatly reduces the amount of metal needed to be removed to achieve flatness on the back of the blade, which shortens initial set-up and subsequent re-sharpening considerably. Secondly, in the case of chisels, it reduces the frictional resistance as the chisel is driven into or extracted from the wood. Thirdly, the interaction of the leading edge of the hollow with the edge of the blade is a changing relationship as the tool is re-sharpened. With plane blades, as the edge is sharpened down to the rim of the hollow, the edge can then be 'tapped-out' (ura-dashi), a process where a pointed hammer is used to depress the ha-gane downward slightly along the bevel of the blade. When the blade's back is re-flattened after ura-dashi, the hollow is re-established; thus the hollow acts as a sort of gauge for sharpening as a means of prolonging the life of the thin piece of cutting steel as long as possible. This in turn tends to keep the geometry of the blade consistent over time,which keeps it fitting the dai over time.
There are many types of steel used for the ha-gane of Japanese planes and chisels:
-White steel, shiro-gane; a nearly pure steel that takes a very keen edge and resharpens easily. There are several types of white steel, #1 and #2 being the most common.
-Blue Steel, ao-gane; a steel with alloyed elements such as molybdenum to enhance the durability of the edge. This steel is a little more difficult to sharpen than the white, and does not take quite as keen an edge, but is more durable in use. The common blue steels used are #1, #2, and "Super-Blue"
-Tama-hagane; this steel derives from the smelting of a special iron-rich river sand and is normally reserved for use in sword-making, however some does find use in saws, chisels and planes.
-Togo-Reigo: this steel was produced by the Andrews Company of Sheffield England in the 1920s and some found its way to Japan where it has been used for making plane blades
-Swedish Steel
Vise
The traditional Japanese vise was a wedge of wood tied to a post with a coil of rope. The wood was inserted under the wedge and the wedge hammered down.
A traditional Japanese vise from Japanese homes and their surroundings by Edward S. Morse
Vises of any sort are used far less in traditional Japanese carpentry than would be the case for equivalent tasks in the traditional crafts of the West. Many tasks in Japanese carpentry associated with building, involve very large pieces of timber, and in general the weight of the timber and of the carpenter are used to stabilize the piece on which the carpenter is working. For this reason the carpenter's horses used in Japan are much lower than their Western counterparts, and carpenters must always position themselves over their work. Much of the work on smaller pieces of material can be done in the seated position, and relies on the fact that the saws and planes both cut on the pull stroke, enabling stabilization of the work using the body or shooting board.
Lumber

Woods used in Japanese carpentry and woodwork, as well as tool construction, include sugi (杉), akamatsu (赤松) hinoki (檜 or 桧), Camphor Laurel, Magnolia obovata, keyaki (欅), and kiri (桐).
References

  1. ^ Lee Butler, "Patronage and the Building Arts in Tokugawa Japan", Early Modern Japan. Fall-Winter 2004 .
  2. ^ http://dougukan.jp/contents-en/index.php?id=217.

External Links

  • Takenaka Carpentry Tools Museum in Kobe. Contains extensive material on the history of Japanese carpentry and carpentry tools, and directions for visiting the museum.
  • Article titled Wood and Transience by Vinayak Bharne & Iku Shimomura
  • JAANUS an on-line Dictionary of Japanese Architectural and Art. Includes extensive carpentry terms defined in English.

- Wikipedia


KANNA (JAPANESE PLANE)

The Japanese plane or kanna (?) is a plane pulled towards the user rather than pushed in the manner of western style planes. They are made of hardwood, usually Japanese white or red oak. The laminated steel and iron blade is stout compared to western planes. Tapered in length and thickness the plane blade is its own wedge as it fits into a correspondingly shaped mortice in the body of the plane. Thus dispensing the need for a separate wedge to hold the blade in place, as is the case in most other traditional wooden planes. The chip breaker is held in place with a simple nail inserted some distance away from and perpendicular to the axis of the main blade. The chip breaker is not tapered like the main blade, instead it has bent "ears" that bear down on the plane blade. Chip breakers in Japan were introduced relatively recently during the Meiji period. The soles of a Japanese planes also have different configurations intended for varying applications. The apparently simple design disguises a great deal of complexity.


A Japanese plane in use.
Types


A Japanese cooper using a yariganna or spear-plane.

  • Hira ganna (平鉋?) is the usual type of flat plane used for smoothing wood. There are several types, depending on the level of finish.
    • Ara shikō ganna (荒仕工鉋?) is used for the first planing.
    • Chū shikō ganna (中仕工鉋?).
    • Jō shikō ganna (上仕工鉋?).
    • Shiage ganna (仕上げ鉋?) is used for finishing work.
  • Kiwa ganna (際鉋?) is a shoulder plane. The blade is angled and inserted into the centre of the plane block at an angle.
  • Mizo ganna (溝鉋?) is a groove plane used for cutting kamoi and shikii (see fusuma).
  • Sori kanna (反り鉋?) is a plane with a convex base used for scooping out curved surfaces.
  • Dainaoshi ganna (台直し鉋?) is used to plane the surface of other planes. Its blade is held at 90 degrees to its base.
  • Yari ganna (槍鉋?) is a spear-like plane, the original plane used in the most ancient buildings. Its use has been revived in Japanese temple carpentry.
  • Nankin kanna (南京鉋?) is a spokeshave with two handles.
  • Tsuki kanna (突き鉋?) is a push style kanna. These planes existed historically in Japan.
The name changes from kanna to ganna are due to rendaku.
External Links

  • Kanna, at JAANUS (Japanese Architecture and Art Net Users System).
  • Japanese plane, at the Takenaka carpentry tools museum.
  • Yarikanna, at the Takenaka carpentry tools museum.

References

  • Kinya Hoshino (星野欣也 Hoshino Kinya?) (1997). Zusetsu kiso mokkōgu no tsukaikata (図説 基礎木工具の使い方?). Shinzansha Shuppan (信山社出版?). ISBN 978-4-7972-1701-8.

- Wikipedia 

Can You Eat a Pomegranate Seed?

Considered “superfoods” because of their healthy nutrient content, pomegranates are available mostly between the months of October and January. Many people don’t know how to eat pomegranates, however, and decide to avoid the fruit because of its seemingly time-consuming cutting process. You can save time and effort by eating the seeds, which are both edible and nutritious.
Can You Eat a Pomegranate Seed?
Pomegranate seeds. Photo Credit risus/iStock/Getty Images

Arils Are More Than Seeds

Pomegranate seeds are enclosed in small, red, jewel-like drops called arils. The material inside the arils is tart and juicy and surrounds the white seeds of the pomegranate fruit. When a pomegranate is cut, you might assume the arils are the seeds, but this is a misconception. The arils and crunchy white seeds are the only edible portions of the pomegranate.

How to Eat the Seeds

It’s easiest to eat pomegranate seeds in conjunction with the arils. It is completely safe to chew and swallow the seeds along with the juicy arils, In fact, you might enjoy the variations in texture. Still, you don’t have to eat the seeds if you don’t care for the texture – simply spit them out as you would when eating seeded watermelons or citrus fruits.

Nutritional Facts

Pomegranate seeds enclosed with juicy arils make up a low-calorie, antioxidant-rich food choice. According to the U.S. Department of Agriculture, a 1/2-cup serving contains 72 calories, along with 8.9 milligrams of the antioxidant vitamin C. The same serving size also has 205 milligrams of potassium and traces of heart-healthy monounsaturated and polyunsaturated fatty acids. The seeds alone contain fiber, which may help you stay fuller longer than just eating the arils alone.

To Seed or Not to Seed

While pomegranate seeds are edible, not everyone appreciates them. In fact, you might seek only the juicy arils wrapped around the seeds. You can still gain some of the nutritional benefits of the pomegranate without eating the seeds -- the choice is purely based on preference. If you want to eliminate the seeds without the hassle of spitting them out, beat the arils gently with a wooden spoon in a bowl. Keep in mind, however, that the juice is likely to break from the arils, so this technique is best saved for making pomegranate juice.
www.livestrong.com

Free Low Glycemic Diet Plan

If you're looking for an eating plan that can lower your risk of diabetes and heart disease and help you lose weight, the low-glycemic diet makes a good choice. The low-glycemic diet is aimed at getting you to eat foods -- namely carbohydrate foods -- that take your body longer to digest and absorb, and this aids in hunger control. The low-glycemic diet does not require you to count calories or carbs but encourages you to eat more whole foods that are high in fiber, such as fruits, vegetables and whole grains.
Free Low Glycemic Diet Plan
A bowl of oatmeal. Photo Credit bhofack2/iStock/Getty Images

Glycemic Index 101

Before you start your low-glycemic diet, it's important to understand a little more about the glycemic index, which is what the diet is based on. The GI is a system in which carbohydrate foods, such as bread, fruit and milk, are ranked on a scale of zero to 100 on how they affect blood sugar. Foods with a low GI, 55 or less, cause only a small, gradual rise in blood sugar, while foods with a high GI, 70 or more, cause more rapid fluctuations in blood sugar. Foods that fall in the middle are referred to as medium-GI foods and are considered OK to include on your low-GI diet.
Low- and Medium-Glycemic Foods
In general, low-GI foods are carbohydrates in their least processed form. For example, rolled oats are a low-GI food, while instant oats are a high-GI food. Other low-GI foods include 100 percent stone-ground whole-wheat bread, barley, most fruits, beans, sweet potatoes, lima beans, corn and nonstarchy vegetables such as broccoli and green beans. Medium-GI foods include whole-wheat bread, brown rice and couscous.

It's OK to Eat High-Glycemic Foods

While you should include mostly low- or medium-GI foods on your low-glycemic diet, it's OK to eat some high-GI foods in moderation. Examples of high-GI foods include corn flakes, bagels, pretzels, saltine crackers, rice cakes, white potatoes, pineapple and melon. To help balance blood sugar and hunger, combine your high-GI food with a low-GI food. For example, eat broccoli with your baked russet potato, or top your saltine crackers with hummus.

Putting It All Together

Although the low-glycemic diet focuses its attention on carbs, it's still important to eat lean sources of protein, such as poultry or fish, and healthy fats, such as olive oil, for balance and health. A healthy low-glycemic breakfast might include cooked rolled oats topped with raisins and almonds and served with nonfat yogurt. For lunch, you might enjoy a turkey sandwich on 100 percent stone-ground whole-wheat bread with an apple, carrot sticks and a cup of vegetable soup. And for dinner, have shrimp and veggie kebabs served with brown rice and beans and a garden salad.
www.livestrong.com

Advantages and Disadvantages of Fasting for Runners

Author BY   ANDREA CESPEDES  Food is fuel, especially for serious runners who need a lot of energy. It may seem counterintuiti...